Spinning
Yarn -
How to Spin, Clean, Wash, and Card Fleece
I became a spinner by accident really. I moved to New Zealand nearly 15 years ago and was there only 2 years, but in a land where you have 3 million people to 20 million sheep, one is naturally drawn to these animals that dot the hills everywhere you travel out and about the countryside. I was invited to a spinning class and it only took one meeting to have me hooked.
I just enjoy the relaxing atmosphere that is created in the art of spinning yarn. It is rhythmically and quiet except for the whir of the spinning wheel and the creak of the treadle. And so I thought I would share with you the steps involved in spinning from fleece to garment.
Cleaning the Fleece
When sheep are shorn the
fleece
itself is very dirty. It therefore needs to be cleaned and then washed
before it can be used by spinners. The first step is to take out all
the seeds, hay or straw that may still be embedded in the fleece.
There may also be some dried mud and matter that can be cut out if it is a small amount and on the edge of the fleece. A lot of the grass and seeds etc. will fall out if you tease the fleece out slightly and give it a couple of vigorous shakes.
There may also be some dried mud and matter that can be cut out if it is a small amount and on the edge of the fleece. A lot of the grass and seeds etc. will fall out if you tease the fleece out slightly and give it a couple of vigorous shakes.
Washing the Fleece
The best way to wash the
fleece before spinning yarn is to
wash it all in a pillowcase to prevent damaging it. Add it to the warm
soapy water and let it sit for about 15 minutes. Squeeze gently to get
the dirt out. Remove from the tub, add clean water and new soap flakes
and repeat. Do this until the water is clean.
You don’t want to remove all the lanolin from the wool as this will make your final product water-resistant and also makes it easier to spin with. You can dye your wool at this stage, if required.
Don’t wring or twist the fleece, but rather squeeze the excess moisture by pressing it out. To dry it take it out of the pillowcase and place it on a flat surface, preferably a clotheshorse lined with towels and dry out of direct sunlight.
Carding the Wool
After the fleece is dry
you will want
to create rovings,
which are
loose fiber rolls of wool that is the
final preparation for spinning yarn. You will need two carding brushes
for
this. You take a card brush, resting it on your knee you take the wool
and pull out the tufts, several at a time. Then tease each tuft out
doing a final of discarding of anything that will ruin your wool.
Now load the carding brush lying on your knee with the teeth facing upwards until you have a thin layer of wool covering the area. With the other card brush draw the fibers across the brush several times until you have the fibers all now lying parallel and you can begin to hear the metallic sound of the teeth. Then remove the wool by the loaded card upwards against the other, and these are then rolled off the card and you have a vice versa with the other brush.
You should now have your wool that is easily rolled up into a roving ready for spinning yarn.
Now it is possible to spin wool without carding it first. Instead you have to "rove" it, which can be done with the hands alone. Take some teased wool in your left hand, release a little of it between your finger and thumb, and pull it out in a continuous rope with your right hand, but not pulling so hard that you break or disengage the rope.
This is not as easy as it sounds and it needs practice. When you have so pulled out all the wool, bend it double and do the whole operation again. Bend it double again (sometimes you might like to triple it) and go on doing this until you are satisfied that it is fairly parallel and well teased-out. This is now a "roving" and you can spin it direct.
I have a Saxony spinning wheel, which is probably the most common of the spinning wheel family. Spinning wheels are easy to use, once you get the hang of it, and certainly easier to use than spindles.
When buying your spinning wheel just make sure that the parts are not warped and that you know what the ratio is between the wheel itself and the little fly wheel next to the bobbin that helps drive the whole contraption.
Usually the drive ratio is 5:1 however there are some spinning wheels with a ratio as much as 20:1. The drive ratio is important because the smaller the drive ratio the thicker the finished yarn.
Spinning the Wool

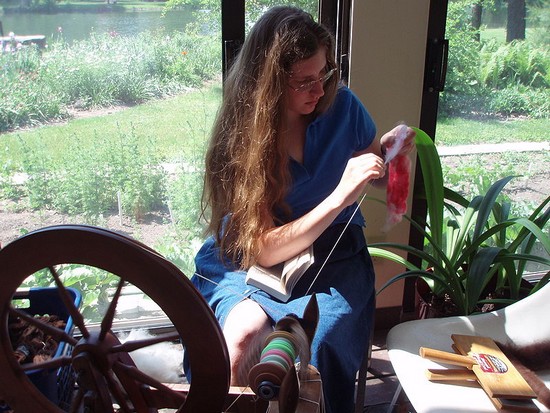
A
Hand spinner
Spinning Yarn - Not me :) But this is an example of a Saxony Spinning
Wheel
The aim of the spinner is to take the rovings, or rollags as they are also called, and draw them rhythmically into the spinning wheel so that you create spinning yarn that is the same thickness, is free of bumps and lumps and has an even twist. It doesn’t take more than a few hours to learn to spin but it can take a while before you get a perfectly spun yarn. However, the joy is in the action, and the perfection will come later with time and practice.
To begin the process, tie some waste yarn around the bobbin and feed it through the flyer and tie it to a roving that has been teased out to about 6 inches of thin fibers. Start pumping the treadle and at the same time gently feed out the fibers by pulling with your right hand as you hold the roving lightly in your left with the left thumb lightly over the top of it to keep it fairly taught but not tight.
To join two rovings together tease out a section to draw out a thin line of fibers and just put them either on top of under the last line of fibers of the previous roving. Proceed as before.
Using your Spinning Yarn
This are simply spare bobbins that have your spun wool on them held horizontally on a wooden dowel. Put the ends of the two yarns together, feed them into the spindle on your spinning wheel just as if you were going to spin, put them round the flyer, tie them to the spindle, and then turn the wheel backwards, or from right to left. This will make two-ply yarn.
Make sure that you are holding the two spun yarns together and that they are being fed onto the wheel at the same time. Also make sure that you have they are going on at the tension. I learned the hard way when the tension wasn't right - it was far too loose - and had to spend hours untangling the whole bobbin of both yarns.
If you want three-ply do the same thing with three bobbins.
Knitting with your Homespun Wool
There really isn't anything as satisfying as making something from scratch, particularly wool crafts as it is one of the few arts where you can make your own garments from start to finish. Spinning yarn from fleece is one of those joys.If you are looking for more information on wool crafts we have the following for you:
Write
to Us if
you are a Spinner or would Like some Advice on Spinning Yarn
You are welcome to drop us a line and talk about anything that is
related to spinning yarn or spinning in general.Leave a Comment
Do you have anything that you would like to add after reading this page? We would love to hear your thoughts. If you can add additional information to what has been written here you will be adding value to the website! No need to have any special skills - just type and submit. We will do the rest!


New! Comments
Do you have something of value to add? Leave me a comment in the box below.