Learn How to Make a Kite this Summer! Easy Kite Making Instructions and Pictures
Learn how to make a kite this summer! You would be surprised just how many people search on the Internet these days looking for kite making instructions on how to build a kite. Which is nice to see really, in this day and age with the kids keeping more and more to their rooms behind their computers, gameboys and X-boxes. So come on mums and dads! Take your kid out on a good family outing, do some bonding with some kite flying and learn how to make a kite for your son or daughter.
The kite is usually made of a framework of wood, is lashed together with cord, strung with cord according to design, and finally is covered with paper; but in each case some other material might be substituted, and you will see this as you learn how to make a kite.The drawings in this article on kite making have the framework represented by full lines and the string by slant dotted lines. The framework must be kept light and strong. It is usually made of wood, the pieces varying in number from two in the plain tailless, to sixteen in a good box-kite, and to a great many in a large tetrahedral kite.
For kite-making soft tough woods are better than the hard, heavy woods. Spruce is considered the most satisfactory, but yellow pine, basswood, and even white cedar will do. For a three foot kite, the California redwood is very satisfactory. Some good sizes of wood to use are 3/16"x3/8"x3', 1/4"x1/2"x4' and 3/8"x3/4"x5'. These should be straight grained and well seasoned.
Sticks should be uniform in weight and bending qualities. Where sticks are to be centered, careful measurements must be made, then by balancing over a knife-blade the difference in weight can be detected and the heavy end reduced by whittling off some. Some try to find center by balancing, but this is very inaccurate; a string may be used for measuring.
Aluminum tubing can be used when learning how to make a kite and some make frames of paper, but they are more for curiosity than utility. For large frames bamboo is excellent, but requires a different fastening of joints than sawn out material, Fig. 1. Split bamboo is excellent for curved outlines and for light framework of butterflies and bird kites, and for Japanese, Korean and Chinese kites. Wire can be used for frames of small kites.
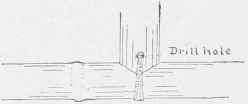
Fig. 1.
How to Make a Kite using Lashings
How to make a kite with lashings? What do we mean by that? Well, when two sticks are to be fastened together, instead of nailing them together, they should be lashed. First wind diagonally around both sticks in both directions, Fig. 2; then wind between sticks around the other windings. This draws all the cord up tight, Fig. 3. Coat over with glue or shellac.
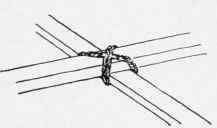
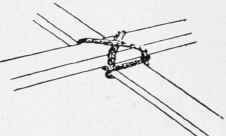
Fig. 2 . Fig. 3.
Large box-kite frames with sawn out material should have the upright posts let into the long horizontal pieces a little, Fig. 4 . If a brace is notched at the end to fit over another piece, Fig. 5, and is liable to split out, it can be wound just back of the notch with thread, Fig. 6, and coated with shellac. All windings should be neatly done without criss-cross windings as in Fig. 7. Which do you like best Fig. 6 or Fig. 7?
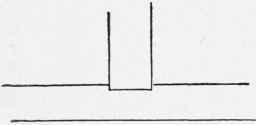

Fig. 4. Fig. 5.


How to Make a Kite with Collapsible Frames
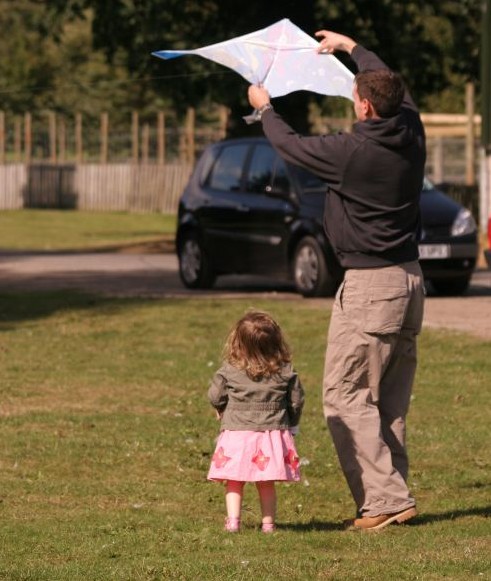 How to make a kite for
your child
How to make a kite for
your childFolding frames can be made for most kites. Large tailless kites have either a removable spine or bow, the square box-kite has braces that spring into shallow notches, and the triangular box and house kite combination can be rolled by having a removable cross-stick. It is a great advantage to have folding kites.
How to Make a Kite: Stringing
Symmetry is so necessary in the making of a good kite, that the stringing becomes an important factor; for if two opposite sides are made unequal, there will be more pressure on one side of center than the other, the kite will be pulling off to one side or darting down and perhaps will refuse to fly at all. A small hard twisted cotton cord is good for stringing as it does not stretch.
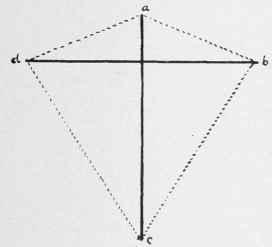
Fig. 8.


Figs. 9, 10.
On kites where the string passes around the entire frame, Fig. 8, it is best to fasten at the end of one stick only, as at a, then pass in the notches of the ends of the other sticks at b, c, d, and tie again at a. We must assume that the horizontal stick in Fig. 8 has been measured accurately for center as that is a part of the framing process. The sticks can be notched with a knife, Fig. 9, or a saw-cut can be made in the end, Fig. 10. The latter is less liable to split out, but the first is more convenient, for every boy is likely to have a knife or can borrow one.
After the string is secured around the entire figure, adjustment between points is made. If a tailless kite is being strung up, the two upper portions are shifted until the right and left sides are equal. The ends are then wound with another cord, Fig. 11, to prevent slipping. The two lower sides are then spaced and the lower end of the spine is secured in the same way.
Some may think it a waste of time to measure the lower strings after the upper ones have been adjusted, but very often there is quite a little difference, due to a springing of the spine. A six pointed star kite would have six, instead of four spaces to even up. Some stringing is used for inside designs, and some is used for strengthening frame.
How to Make a Kite: The Covering
Probably more tissue paper is used in covering kites than any other material because this is how to make a kite the easiest and cheapest way. There are a number of kinds of tissue papers, but the cheapest, because it is the cheapest, is used most. These cheap tissue papers can be found in all shades and tints of colors.
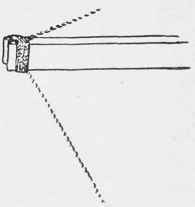
Fig. 11.
The French tissues are more durable, and as a rule, more brilliant in color. A kite covered with this paper can be used from time to time without being disabled.
The Chinese tissue paper is the strongest of all tissues in one direction, and should be used so as to bring the length way of the paper in the direction of greatest strain. This paper only comes in a cream color, but is very satisfactory where strength and hand color work are desired. There are some wrapping papers that are pliable and strong enough to be used, especially on box-kites, but only a few of these are of much service on plain surface kites. The tight covering on a box kite is an advantage. You can of course just use plain brown parcel paper which works just as well.
You can also learn how to make a kite using material as a covering and cambric is the most popular, although calico or any similar cotton cloth will do. The sizing is sufficient to keep the covering in shape during construction, it is light in weight, comes in variety of good colors and is cheap. When cloth is used on plain surface kites, care must be observed that the goods are not used on the bias, as the unequal stretching would unbalance the poise of the kite. Silk is excellent, but it is the most expensive option.
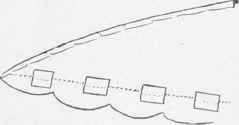
Fig. 12.
Most coverings are turned over the outer strings, and arc pasted or sewn down. In representative figure kites, the edge of the paper is sometimes left free, while the string is made fast by extra strips of paper pasted fast over the string and to the back of the cover, Fig. 12, thus leaving the edges to flutter in the breeze. Some large kites can be covered with paper, if a network of string is used at the back to give support to the covering.
Tailless, and some other kites require loose coverings, this looseness should be planned for in a systematic manner. If the cover of a 3-foot kite is placed on a table or the floor with the frame laid on top, the edge of the cover may be cut one inch or one and one-half inches to the outside of the string. Instead of turning in this whole amount, only turn in one-half inch of the outer edge. This leaves plenty of looseness for bagging of cover, and is regular.
How to Make a Kite: Putting on the Kite Tail
A tail and other balancers are used to give poise to an otherwise unsteady kite. When a kite is constructed in such a way as to present a broad flat surface to the breeze, it will sway and dive and no matter how carefully you attach your bridle it cannot be supported in the air.
For kites that represent irregular forms, there must also be a special balancer. The tail is usually resorted to in such cases. The tail is more than a weight. A foxy kite refuses to come to terms by the addition of a thread and lead or other weight. The weight drops so quickly to its plumb line that the kite has not come to poise, and makes another pitch in some other direction.
 The
value of the tail depends not so much on
weight as on its pulling capacity while being drawn through the air.
The
tail, usually consisting of a string with a number of pieces of paper
folded and tied thereon, Fig.
13, and with cloth streamers at the end for weight, exerts
considerable pull for long enough time to give steadiness to the
kite.
The
value of the tail depends not so much on
weight as on its pulling capacity while being drawn through the air.
The
tail, usually consisting of a string with a number of pieces of paper
folded and tied thereon, Fig.
13, and with cloth streamers at the end for weight, exerts
considerable pull for long enough time to give steadiness to the
kite.
How to make a kite successfully means that the kite must have poise in the air just as we balance a board on the end of a finger - if the finger is not centrally located, the board will fall to the left, or right, front or back; so with the kite, if the pressure of the air is not centrally located it will glide to left or right, or pitch forward or tumble backwards.
The tail helps most in
remedying the two latter troubles. Almost any light surface can be
supported in the air by proper attachment of bridle and tail. The
Japanese use two or more tails on their square kites consisting usually
of long cotton ropes with large tassels on the end. These look very
beautiful trailing out in long graceful parallel lines.
RECOMMENDED BOOKS ON HOW TO MAKE A KITE
You can Add your Own Comments on How to Make a Kite!
We have lots of pages where you can contribute to throughout this homesteading website. We love hearing from our readers, and hope you will be one of those we hear from too. Look around our homesteading website. If you have anything that you can add on how to make a kite please add them by using this submission page below. We would love to have your contributions!
Leave a Comment
Do you have anything that you would like to add after reading this page? We would love to hear your thoughts. If you can add additional information to what has been written here you will be adding value to the website! No need to have any special skills - just type and submit. We will do the rest!
Other Comments
Click below to see comments from other visitors to this page...
Sunday Comics for Kite Making Not rated yet
When I was a child, we used dowels, kitchen string and the Sunday comics. We also used Dad's old t-shirts for the bows on the tail.
Every spring, …
Did you find this page helpful?
Sharing is a way of saying, "Thanks!"


New! Comments
Do you have something of value to add? Leave me a comment in the box below.