How to Knit - Easy Knitting Instructions and Step-by-Step Pictures
Learn how to knit with these easy knitting instructions and step-by-step guide using simple pictures. Knitting is so easy, requires little effort, and can be very relaxing. It is a hobby that you can do in front of the fireplace on a cold winter's night, while you are watching your favorite TV program. More complicated patterns take more concentration, but in the main, knitting is not a difficult hobby to pick up at all.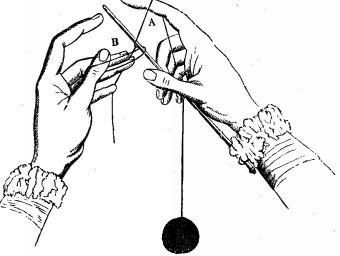
HOW TO KNIT AND CAST ON WITH ONE NEEDLE
The first process in knitting is known by the term CASTING ON- There are two ways of doing this: with one needle, and with two. Our first diagram represents the former process. Take the thread between the second and third fingers of the left hand, leaving an end of about a yard for every hundred stitches; pass it round the thumb of that hand, giving it a twist, so as to form a loop. Take a knitting-needle in the right hand, insert the point in the loop, and pass the thread from the ball round the needle; then bend the point of the needle through the loop, which tighten, and one stitch will be complete. Continue to make loops over the thumb, with the end of thread, and knit them with that from the ball until the proper number is cast on.
HOW TO KNIT AND CAST ON WITH TWO NEEDLES
To cast on with two needles, (generally called the Spanish method), begin by making a loop on the end of the thread, into which slip the point of one needle, holding it in the left hand. Take the other needle in the right hand, and slip its point into the same loop, bring the thread round the point of this needle, and bend the needle towards you, so that the thread forms a loop on it. Slip that also on the left needle, without withdrawing it from the right. Put the thread round the right again, and repeat the process.
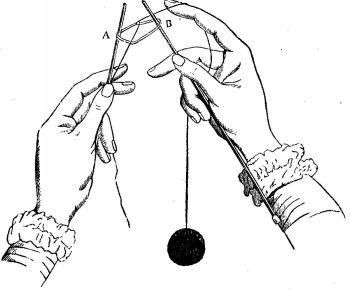
HOW TO KNIT AND CAST ON WITH TWO NEEDLES
KNITTING INSTRUCTIONS FOR PLAIN KNITTING: After all the stitches are cast on, hold the needle containing them in the left hand. Pass the thread round the little finger of the right hand, under the second and third, and above the point of the first. Then take the other needle in the right hand, slip the point in the first stitch, and put the thread round it; bring forward the point of the right-hand needle, so that the thread forms a loop on it. Slip the end of the left-hand needle out of the stitch, and a new stitch is knitted.
KNITTING INSTRUCTIONS FOR THE GERMAN METHOD: The thread, instead of being held by the fingers of the right hand, is passed over and under those of the left. The process otherwise is exactly the same.
KNITTING INSTRUCTIONS FOR PURLING: Begin by bringing the thread in front of the right-hand needle, which slip into a stitch pointing towards you; that is in the reverse of the usual mode (see diagram). Put the thread round the point of the needle, still bringing it towards you, bend the needle backwards to form a loop, and withdraw the stitch from the point of the left-hand needle.
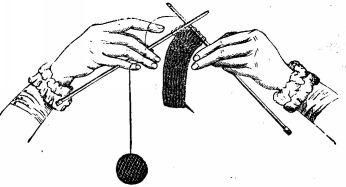
HOW TO KNIT USING PLAIN KNITTING
When knitted and purled stitches occur in the same row, the thread must be brought forward before a purled stitch, and taken back before a knitted one.
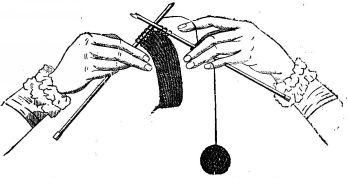
HOW TO KNIT USING THE GERMAN METHOD
KNITTING INSTRUCTIONS TO MAKE A STITCH - Bring the thread in front, as if for a purled stitch, so that when you knit one the thread will pass over the needle, and will make a hole in the following row. This diagram shows the manner of making three stitches, and any other number could be made, by putting the thread round a proportionate number of times. In the engraving it will be seen that the thread is put twice entirely round the needle; and then brought forward, so that the next knitted stitch will take it over a third time. In doing the next row, knit one, purl one, knit one of these stitches; however many are made, they must be alternately knitted and purled in the next row. When the stitch allowing the made stitches is to be purled, the thread must be entirely passed round the needle, once for every stitch to be made, and brought forward also.
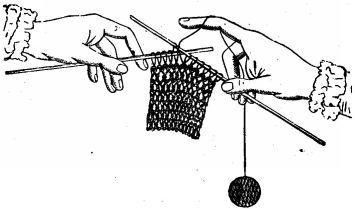
HOW TO KNIT USING THE PURLING PATTERN
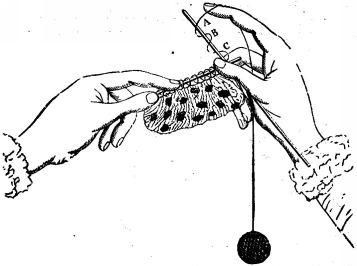
HOW TO KNIT AND TO MAKE A STITCH
KNITTING INSTRUCTIONS FOR A SLIP STITCH: Pass a stitch from the left needle to the right, without knitting it. There are two ways of decreasing: first, by knitting two, three, or more stitches as one, marked in knitting, as k 2 t, k 3 t, etc. Secondly, in the following way: slip one stitch, knit-one, pass the slip stitch over: this decreases one stitch. To decrease two; slip one, knit two together, pass the slip stitch over.
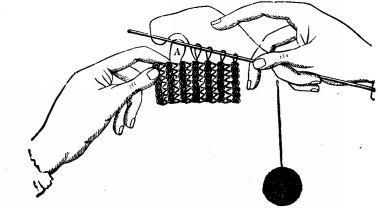
HOW TO KNIT AND TO DECREASE STITCHES.
A reverse stitch is taken off the left-hand needle, in the reverse way to knitting and purling. In both these, the right-hand needle is inserted in the middle of the stitch, and the point brought out towards you or otherwise. But to make a reverse stitch, you insert the point of the needle in the stitch at the back of the work, and bring it forward through the opening in which it generally is inserted. The thread is to be placed round it, as for a purled stitch.
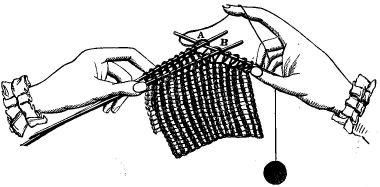
HOW TO KNIT TWO PIECES TOGETHER
To reverse two, three, or more stitches together, insert the needle in them all at once, from the last to the first.
KNITTING INSTRUCTIONS TO TAKE UP STITCHES: Insert the needle in the loop, pass the thread round, and knit it in the usual manner. Do not draw out any loop more than can be avoided, while knitting it.
KNITTING INSTRUCTIONS TO KNIT TWO PIECES TOGETHER: To do this there must be an equal number of stitches on both.
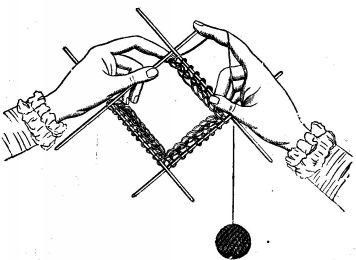
HOW TO KNIT TO FORM A ROUND
Hold the needles together in the right hand, and knit as usual, inserting the left-hand needle in a loop of each at the same time, and treating the two as one.
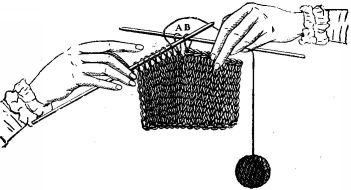
HOW TO KNIT AND CASTING OFF
KNITTING INSTRUCTIONS TO FORM A ROUND: This diagram represents the French manner of performing this process by casting the whole number of stitches on one needle, and then distributing them on three, or perhaps four. But the English mode is to divide the number of stitches, and cast so many on each needle, not withdrawing the last stitch of each needle from the point of the next needle. When all are cast on, the round is made by knitting the two first stitches on to the last needle. Four needles are employed for stockings, five for doilies and other round articles.
KNITTING INSTRUCTIONS TO CAST OFF:Knit two stitches, insert the point of the left hand needle in the first stitch, and draw it on the other. Knit another stitch, and treat these two in the same way.
As you can see, learning how to knit is a very simple exercise. We hope you have lots of fun this winter learning your new hobby!
RECOMMENDED BOOKS ON LEARNING HOW TO KNIT
You can Add your Own Comments How to Knit!
We have lots of pages where you can contribute to throughout this homesteading website. We love hearing from our readers, and hope you will be one of those we hear from too. Look around our homesteading website. Feel free to tell us about your own experiences on learning how to knit, knitting tips or advice. Just use the form below.
Leave a Comment
Do you have anything that you would like to add after reading this page? We would love to hear your thoughts. If you can add additional information to what has been written here you will be adding value to the website! No need to have any special skills - just type and submit. We will do the rest!





New! Comments
Do you have something of value to add? Leave me a comment in the box below.