The Fresh Girl's Guide to Easy Canning - Canning Book Review
I was sent a couple of books by Voyageur Press this week to review, and one of the little gems inside the parcel was a book called “The Fresh Girl’s Guide to Easy Canning and Preserving", by Ana Micka which I offered to review.
I have to confess that when I first read the title I misread it as Girl Guides and I combed through neglected memories of sausages on sticks, campfires and marshmallows, but couldn’t remember any canning involved.
On further investigation I realized that I had indeed misread the title and on opening the book I soon realized that it was a great little book for novice canners wanting the basics of how to can but it was also a great book for the more advanced canner as it goes beyond the basics and has some wonderful canning recipes from around the world, including some award winning canning recipes.

Out of all the canning book reviews that I have done in my time, this
little book stood head and shoulders above the rest.
What I like about it is the simple way in which it has been written. The text is straight forward, and home canning instructions are cleanly laid out. For those of you who have long been mystified by complex canning instructions, then this is the book for you. This is a book for those looking for easy canning. And who doesn't?
Words are used economically with clear instructions, quick understanding and a feeling that anything within the book is easily achievable.
One thing that I was not crazy about was the accompanying pictures with the text. The artwork was too simplistic and stylized and I would have preferred proper photographs. Especially pictures on how to can giving step-by-step instructions. However, this is a minor detail and perhaps I am being too picky.
There are several sections to this book. The first, as you would expect, focuses on the basics, the type of equipment needed and the stress for total cleanliness and sterilization. However, it guides you through growing your own canning garden, how to choose your produce for canning, instructions on how to can, and safety aspects of the canning process.
As you would expect the 2 main methods of home canning are discussed at length.
Home Canning Instructions - Two Methods of Canning
The two methods of canning are discussed in detail, but in simple terms so that you understand the process but are not bombarded or confused by additional irrelevant material in order to get the job done. In the process using a hot water bath method of home canning instructions are given for fruits and sauces, jam, tomatoes and pickles.
In
the section on
pressure cooker canning, home canning instructions
there cover how to can using a pressure canner, how to can vegetables
both
diced and whole, as well as how to can stocks and soups.
Try the Award Winning Canning Recipes!
My favorite sections were reading the award winning canning recipes and also those from around the world. The canning recipe for apple sauce has already been mentioned, however, there is also another for strawberry jam that uses very little sugar and includes dried apples.
I tried the strawberry jam recipe with the dried apples, and it was delicious. The jam was far less sweet than usual which I enjoyed because the taste of the strawberries wasn't masked by the sugar, and not only was the taste better, but I had no trouble getting it to set either.
The around the world section covers appetizers, soups and stews, main dishes, side dishes, desserts and condiments. Recipes for a simple Boeuf Bourguignon, Korean Kimchi, Baked Beans, Tomato Barbecue Sauce or a Tex-Mex Vegetarian Chili are here, to name but a few.
A nice addition to this publication on how to can, which is a must for any how-to book, is the accompanying video. Here you will not only learn the basics of canning take place, but the first episode is an interesting way of making an award winning apple sauce that is made using 3 different types of apples that the presenter doesn’t divulge, but it is made without peeling the skins.
Instead a Victorio food strainer is used that mills the apples and spits apple sauce out one side and discards the peels at the other. This is a very handy gadget, for those too who want to make tomato sauce. Of course if you don’t have one of these ‘must have’ gadgets then you will have to spend time removing all the skins first.
So, would you like a peep of what is inside this book? I thought you would! So here is the canning recipe for Naturally Sweet Strawberry Jam by Paula Pentel, the lady who has won awards at county state fairs for her Apple Sauce recipe, as well as others. If you want to learn more about that particular recipe, then you will have to buy the book. But here is her recipe for strawberry jam.
Home Canning Instructions for Naturally Sweet Strawberry Jam
Makes 5 pints (2.41 l)
Standard jam recipes use quite a bit of sugar. This jam recipe instead creatively uses dried apple pieces, which both sweeten and add pectin to create the desired jam consistency. Make sure to buy the book and watch the Fresh Girl’s Guide to Easy Canning and Preserving DVD to see this great jam made step-by-step.
1 C (90g) dried apples
2 qts (837 g) strawberries
1 T (15ml) pectin mixed with 1 T (12g) sugar
Boil water. Submerge all jars, lids, and any kitchen tools you will be using for 2 minutes in boiling water.
Gather clean towels for the countertops and for wiping down the jars.
Clean kitchen surfaces with hot water and a touch of vinegar.
Make sure that your hands are squeaky clean.
Fill your hot water bath canner 2/3 full with water and bring to the boil. You want enough water so that when you submerge the jars, the water level remains 2 inches above the lids. Adding vinegar (2 tablespoons (30 ml) or a good splash) helps if you have hard water. Minerals in the water tend to form a cloudy surface on your jars. Vinegar helps to keep the minerals in the water and off your jars.
Prepare your canning recipe, using only recipes meant for home canning. Fill your sterilized jars with the food, leaving the recommended amount of headspace. Use a non-reactive kitchen utensil, such as a narrow rubber spatula or a bamboo skewer, to remove air bubbles.
Air bubbles can cause uneven heating during the process and may impair the jar’s ability to seal. Using a clean paper towel, wipe the rims of the jars. This removes any spilled liquid or food, which can also prevent the jar from sealing. Place a dome lid on top of the jar and secure with a jar ring, screwing on so it’s secure but not tight.
Now chop dried apples in food processor.
Wash strawberries and remove stems.
Add strawberries to a medium-sized, stainless-steel or enamel pan and mash.
Add apples and lemon juice to pan. Turn heat to high.
Wait until mixture reaches a strong boil, then add pectin-sugar solution.
Let cook for 2 minutes or until thickened.
Using funnel, pour mixture into hot jars, leaving a 1/2 inch (6.4mm) headspace. Remove any air bubbles with a rubber spatula or clean wooden chopsticks.
Clean rims and any spills with sterile cloth. Secure lids and rings.
Place jars on rack in canner with boiling water.
Once water returns to boil, process for 5 minutes, adjusting for altitude if necessary.
Remove jars and let
cool on the
counter. Check
seal before storing. Refrigerate any unsealed jars and use within 2
weeks.
Well, as I said earlier, I thought that I would try the recipe myself, before adding this canning book review, and I have to say that the jam was delicious. It had far less sugar than normal, but what I liked about the jam was that it wasn't at all sour. What it did do, was allow the taste of the berries to come through.
Below is a picture of the finished jam. Because of the use of the apples, the jam had a different consistency, although I can assure you that it soon disappeared and there were clamours for more!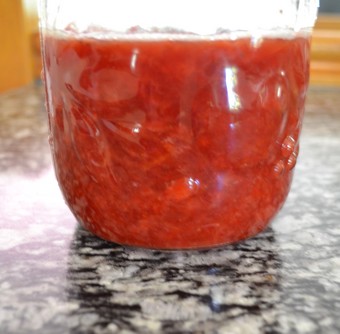
You can Add your Comments on this book on Home Canning Instructions
We have lots of pages where you can contribute to throughout this homesteading website. We love hearing from our readers, and hope you will be one of those we hear from too. Look around our homesteading website. If you have some Comments of your own, please submit them. All you need to do is type and submit. We will do the rest!
Leave a Comment
Do you have anything that you would like to add after reading this page? We would love to hear your thoughts. If you can add additional information to what has been written here you will be adding value to the website! No need to have any special skills - just type and submit. We will do the rest!
Don't miss out on our latest news and articles. Sign up for our free monthly e-zine!
Go from Canning Book Review back to Bestselling Books
Go to Canning Recipes
Go to Home Canning
Go to How to Make Pickles
Go to Self Sufficient Living
Return to Countryfarm Lifestyles and Homesteading




New! Comments
Do you have something of value to add? Leave me a comment in the box below.