Free Chicken Coop Plans for Ark and Run for 12 Chickens with Diagrams
The principle of the combined chicken run and ark coop - which will accommodate a dozen chickens without overcrowding, especially if it be moved from time to time on to fresh ground - will be understood from Figs. 1 and 2.
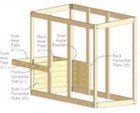
The first of these free chicken coop plans shows the framework to which the boards for the coop and the wire for the chicken run are nailed. Its over-all length of 10 feet is subdivided into five "bays" or panels, 2 feet long (nearly) between centers of rafters. Two bays are devoted to the coop, three to the run.
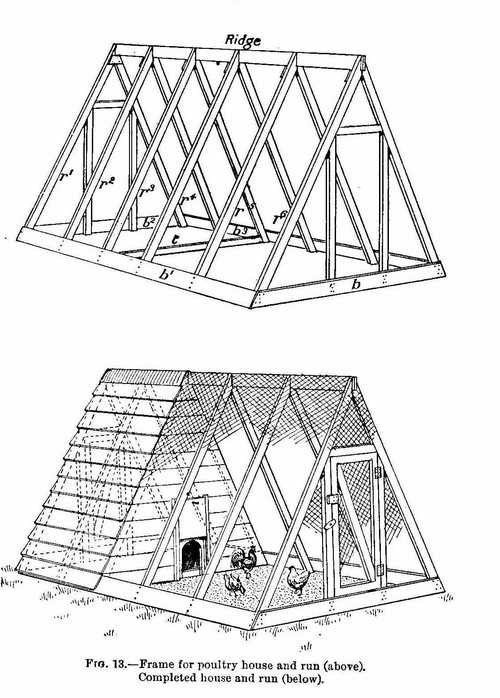

Fig. 1. Frame for chicken coop and run (above).
One square (10 by 10 feet) of weather boarding 6 inches wide, for covering in the coop.
44 feet of 4 by 1, for base and ridge.
56 feet of 3 by 1, for eight rafters.
28 feet of 3 by 1-1/2, for four rafters.
50 feet of 2 by 1-1/2, for door frames and doors.
6 feet of 2 by 2, for tie T.
45 feet of 2-foot wire netting.
Two pairs of hinges; two locks; staples, etc.
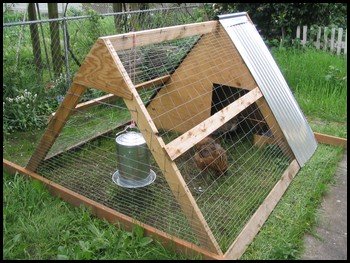 By following these free chicken
coop plans one can build the
chicken coop and run quite economically. However, the cost could be
further reduced by using lighter stuff all through for the framework
and doors and by covering in the coop with old boards, which may be
picked up cheaply if one is lucky.
 Whether it is advisable to sacrifice durability and rigidity to cost must be left to the maker to decide. Anyhow, if the specifications given are followed, you will have a chicken coop that will last several years.
A Few Points Regarding your Free Chicken Coop Plans
The vertical height of the chicken run is just under 6 feet, the tips being cut away from the rafters at the apex. The width at the ground is exactly 6 feet. The base angles made by AA with B (Fig. 2) are 63 degrees; that which they make with one another, 54 degrees. The rafters r1 and r3 at each end of the coop are half an inch thicker than the rest, as they have to stand a lot of nailing.
Construction of your Chicken Coop
Cutting The Rafters for your Free Chicken Coop Plans
If floor space is available, chalk out accurately the external outline of a pair of rafters (80 inches long each before shaping) and a line joining their lower ends. Then draw a line bisecting the ridge angle. With this template as guide the rafters can be quickly cut to shape.
Another method is to cut one rafter out very carefully, making a notch for half the width of the ridge, and to use it as a pattern for the rest. In any case the chalked lines will prove useful in the next operation of pairing the rafters and uniting them by a tie just under the ridge notch.
Cut a 4 by 1 inch notch at the bottom of each rafter, on the outside, for the base piece. The two end pairs have the B pieces (Fig. 2) nailed on to them, and r3 the tie t, which should be in line with the rafters. The other three pairs require temporary ties halfway up to prevent straddling during erection.
Door Frames and Doors for your Free Chicken Coop Plans
The method of fixing the frame of the door at the chicken run end is shown in Fig. 2. The material for the frame being 1/2 inch thicker than that of the rafters, there is room for shoulders at the top angles, as indicated by dotted lines. The door frame at the coop end is of the same thickness as r1 so that no overlapping is possible. This being the case, screws should be used in preference to nails, which are liable to draw a sloping face out of position as they get home.
The doors for this chicken coop are made of 2 by 2 inch stuff, halved at the corners. Cut out the top and bottom of the two sides; lay them on the floor so as to form a perfect rectangle, and nail them together. The strut is then prepared, care being taken to get a good fit, as any shortness of strut will sooner or later mean sagging of the door. Cut the angles as squarely as possible, to ensure the strut being of the same length both inside and out.
A Note for your Free Chicken Coop Plans
Free Chicken Coop Plans and Covering The Ends Of The Coop
The ends of the chicken coop should be covered before erection, while it is still possible to do the nailing on the flat. The run end is boarded right over, beginning at the bottom, and allowing each board to overlap that below it by 1 inch. The board ends are flush with the outer sides of the rafters. When boarding is finished, cut (with a pad saw) a semicircular-topped run hole, 14 inches high and 8 inches wide, in the middle of the bottom. Any structural weakness caused by severing the two lowest boards is counteracted by the two grooved pieces in which the drop-door moves.
Odds and ends of weather boards should be kept for the door end of the chicken coop, which requires short pieces only, and is not boarded below the top of b2. The door may be weather-boarded to match the rest of the end, or covered by a few pieces of match-boarding put on vertically.
The two base pieces, b1 and b2, and the ridge should be marked off for the rafters at the same time. All three are 10-foot lengths of 4 by 1 wood, unless you prefer the ridge to project a bit, in which case you must allow accordingly.
Stand all three pieces together on edge, and make the marks with a square across the tops. Allow a distance of 4 feet between the outside faces of r1 and r3; halve this distance to get the center of r2; and subdivide the distance between r3 and r6 so that each rafter is separated from its neighbors by an equal space, which will be 1 foot 11 inches.
Number the marks and continue them down the sides of the boards with the square. There should be a mark on each side of the place to be occupied by the intermediate rafters, to prevent mistakes; for it is obvious that if a rafter is fixed on the left side of a single ridge mark and on the right of the corresponding mark on the base, the result will not be pleasing.
Free Chicken Coop Plans and Erecting the Hen coop
The services of a second pair of hands are needed here, to hold while nailing is done. Nail holes having been drilled in the tops of the rafters and in the base pieces, the ends are stood upright and tacked to the ridge at the places marked for them, and after them the intermediate rafters, working from one end to the other. Then tack on the base pieces, b1, b3.
Get the ends quite perpendicular, and nail a temporary cross strut or two on the outside of the rafters to prevent shifting while the final nailing up is done.
Free Chicken Coop Plans and Covering The Shed
Sixteen boards, 4 feet 2 inches long, are needed for each side, as, owing to the overlap of one inch, each tier covers only five of the 80 inches. The ridge is made watertight by a strip of sheet zinc, a foot wide, bent over the top and nailed along each edge.
Free Chicken Coop Plans and Waterproofing
All the woodwork should now be given a coating of well-boiled tar, paint, creosote, or some other preservative, worked well down into the cracks. Creosote and stoprot are most convenient to use, as they dry quickly.
Free Chicken Coop Plans and Netting
When the preservative has
dried, fix on the netting with
3/4-inch wire staples. Begin at the base on one side, strain the
netting over the ridge, and down to the base on the other side. Be
careful not to draw the rafters out of line sideways. The last edge
stapled should be that on the roof of the coop.
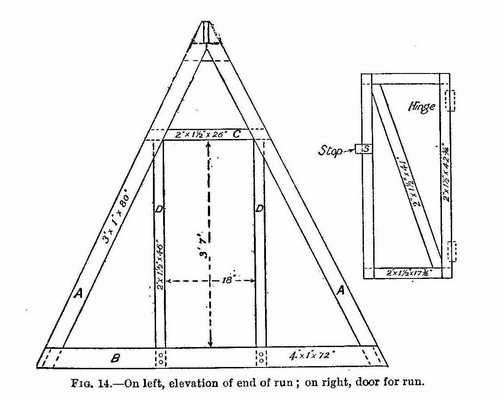
Fig. 2. On left, elevation of end of run; on right, door for run.

Note for your Free Chicken Coop Plans
Free Chicken Coop Plans and Finishing Off
The doors to the chicken coop are now hung and your chicken coop plans are finally paying off! The doors are also fitted with buttons and padlocks. The stops should be on the doors, not on the frames, where they would prove an obstruction in a somewhat narrow opening. Perches should be of 2 by 1 inch wood, rounded off at the top, and supported in sockets at each end so as to be removable for cleaning; and be all on the same level, to avoid fighting for the "upper seats" among the chickens.
A loose floor, made in two pieces for convenience of moving, will help to keep the fowls warm and make cleaning easier, but will add a few dollars to the cost.
The inside of the chicken coop should be well whitewashed before fowls are admitted. To prevent draughts the triangular spaces between the roof boards and rafters should be plugged, but ample ventilation must be provided for by holes bored in the ends of the coop at several elevations, the lowest 2 feet above the base.
Handles for lifting may be screwed to the faces of b and b2 halfway between the door frame and the corners.
Did you find this page helpful?
Sharing is a way of saying, "Thanks!"
Follow Us and Keep Up to Date
Other Chicken Resources you May be Interested in
Go
from Free Chicken
Coop Plans to DIY Projects
Go to How to Raise Chickens
Go
to Feeding Chickens
Go
to Cleaning Chicken Pens with Fire
Go
to Chicken House Plans
Go
to Backyard Chickens
Go
to FAQ Raising Chickens
Go
to Butchering Chickens
Go
to Caponize Chickens
Go
to Coccidiosis in Chickens
Go to Natural Remedies for Sick Chickens
Go
to
Self-Sufficient Living
Go
to Chicken
Recipes
Go
to
Farm Animals
Go to Country Living
Do you have Something to Share on our Free Chicken Coop Plans?
We have lots of pages where you can contribute to throughout this homesteading website. We love hearing from our readers, and hope you will be one of those we hear from too. Look around our homesteading website. If you have some comments, tips and ideas regarding our free chicken coop plans of your own, please submit them. All you need to do is type and submit. We will do the rest! If you have some pictures of your own designs we would love to see them!
Leave a Comment
Do you have anything that you would like to add after reading this page? We would love to hear your thoughts. If you can add additional information to what has been written here you will be adding value to the website! No need to have any special skills - just type and submit. We will do the rest!
Don't miss out on our latest news and articles. Sign up for our free monthly e-zine!
OTHER SECTIONS OF INTEREST
 Feeding
Chickens
Chicken Coop Plans
 Natural
Remedies for Sick Chickens
Chicken Resources and
Information
Click Here
Raising Chickens Bonanza

Click Here





New! Comments
Do you have something of value to add? Leave me a comment in the box below.