Secrets to Canning Green Beans and Keeping them Green
When canning green beans
be aware that this is a low acid vegetable that needs to be processed
in a pressure canner /cooker to make sure that no bateria, particularly
clostridium
botulinum is able to breed afterwards.
Choose only young, crisp and tender beans that will pass the "snap test". Take a bean, bend it in half, if it is fresh enough for canning then it will easily snap in half.
Avoid canning beans that are soft, wrinkled or limp, where you can easily see the beans in the pods as they are too mature for successful canning, and don't use beans that are blemished or growing mold on them.
Canning Green Beans and Good Varieties
Canning green bean varieties come in 2 forms:
1) The bush beans that are
small and compact to grow, and also known as snap beans or string beans.
When canning these bean varieties you do have to remember to remove the string from the back of the bean although these days, you can get stringless varieties which are great to can.
2) The pole beans that are the climbing variety.
The best bush beans for canning are: Goldmine, Blue lake 274, Topcrop, Tendercrop, Contender, Provider, Strike, Improved Tendergreen, and the heirloom varieties, if you can still get hold of them, Refugee and Stringless Green Pod.
The best pole beans for canning are Blue Lake FM-1 and Kentucky Wonder.
Canning Yields: How many Beans do I need for a Pint or Quart?
In approximate terms, 1 pound of beans (500g) will give you 3 cups (750g) of sliced beans. So for a quart jar you will need 1 - 1 1/4 lb (500 - 625g) beans.Canning Green Beans Method 1
Wash your green beans
and trim both top and tail. Slice your beans diagonally into 1 inch
pieces. This is known as the French way, but if you want to you can just straight cut them or leave them
whole after top and tailing them. For a better product grade your beans
so that when you have canned them they are of uniform size in each
batch.
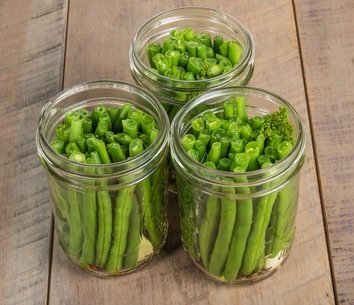
Place your beans into clean, sterilized jars and pack as many into the jar as possible, leaving a 1/2 inch heaspace. Add 1/2 teaspoon salt to pint jars, and 1 teaspoon salt to quart jars.
Cover the beans with boiling water, leaving 1/2 inch headspace. Get any air bubbles out at this stage. You do not want to use a metal utensil, rather use a wooden skewer or similar. Add extra water at this stage to make up the correct levels of headspace.
Put on the jar lids fairly tightly but not too tight. Process in a pressure canner at 10lbs pressure (240°F).
For pint jars for 20 minutes
For quart jars for 25 minutes
These timings are for those who are living from 0-1000 ft sea level. If you are living higher than this, then please adjust the processing times, accordingly.
After the processing time, turn off the heat, let the pressure canner return to 0, wait a few minutes and then slowly open the vent. Unlock your canner and then open it up. Wait a further 10 minutes before lifting out the jars.
As soon as you have removed jars from canner, tighten lids, and turn upside down to check for leaks. Place on a tea towel until cool.
So this is one way of canning green beans, but there is another method that works just as well.
3 jars of canned beans
Place your beans into clean, sterilized jars and pack as many into the jar as possible, leaving a 1/2 inch heaspace. Add 1/2 teaspoon salt to pint jars, and 1 teaspoon salt to quart jars.
Cover the beans with boiling water, leaving 1/2 inch headspace. Get any air bubbles out at this stage. You do not want to use a metal utensil, rather use a wooden skewer or similar. Add extra water at this stage to make up the correct levels of headspace.
Put on the jar lids fairly tightly but not too tight. Process in a pressure canner at 10lbs pressure (240°F).
For pint jars for 20 minutes
For quart jars for 25 minutes
These timings are for those who are living from 0-1000 ft sea level. If you are living higher than this, then please adjust the processing times, accordingly.
After the processing time, turn off the heat, let the pressure canner return to 0, wait a few minutes and then slowly open the vent. Unlock your canner and then open it up. Wait a further 10 minutes before lifting out the jars.
As soon as you have removed jars from canner, tighten lids, and turn upside down to check for leaks. Place on a tea towel until cool.
So this is one way of canning green beans, but there is another method that works just as well.

3 jars of canned beans
Canning Green Beans Method 2
Another way of canning
green beans is to cook them for a short while before placing them in
your bottles. Wash the beans and trim both ends. Cut into 1 inch pieces
and cover them with boiling water in a saucepan and boil for 5 minutes.
Remove from heat, and reserve the water that the beans have been cooked in. Now pack the hot beans into clean sterilized jars loosely to a 1/2 inch at the top of the bottles, Add 1/2 teaspoons salt to pint jars, and 1 teapoons salt to quart jars. Reboil the reserved cooking liquid and then pour this over
the beans in the jars. Leave a 1/2 inch headspace.
Slightly tighten lids and process in a pressure canner/cooker at 10 lbs pressure (240°F). Process pint jars for 20 minutes and quart jars for 30 minutes. Tighten the seals as soon as you remove the jars from the canner. Place on a tea towel until cool before storing.
Canning Green Beans so that they Stay Green
So here is the secret
you have been wanting to read about. It all comes down to bicarbonate
of soda. Add 1/2 teaspoon bicarbonate of soda to each gallon of boiling
water to keep you beans green. Although this part of the process is
only for aesthetic, and not necessary, I do it because I hate looking
at grey beans in a jar, they just look very unappetizing.
So, add your beans to this water, boil the beans for 5 minutes, removed from the cooking liquid and plunge into 1 quart icy-cold water to which 1 tablespoon of salt has been added. Leave the beans in the salty water for 30 seconds and then remove and place into the jars. Do not add either of these liquids to your beans in the jars.
So, add your beans to this water, boil the beans for 5 minutes, removed from the cooking liquid and plunge into 1 quart icy-cold water to which 1 tablespoon of salt has been added. Leave the beans in the salty water for 30 seconds and then remove and place into the jars. Do not add either of these liquids to your beans in the jars.
Did you find this page helpful?
Sharing is a way of saying, "Thanks!"
Follow Us and Keep Up to Date
Don't miss out on our latest news and articles. Sign up for our free monthly e-zine!
Go from Canning Green Beans back to Home CanningGo back to the Home Page
OTHER SECTIONS OF INTEREST
 Home
Canning
How to Make Pickles
 More
Canning Recipes
Home Canning Book
Preserving Food


New! Comments
Do you have something of value to add? Leave me a comment in the box below.