Homemade Candy Making Secrets and Recipes
Candy making is fun to
do with the kids, and our easy candy recipes are
for those old fashioned sweets you used to see in stores, but sadly no
more. We share some secrets with you to make great candies at home as
well as what utensils, ingredients and instructions you need.
Traditionally, candies have been made by women, so there is nothing stopping you carrying on the tradition today within your own families!
Sooner of later most cooks want to try their hands at candy making, even if only to try the simplest toffee or peppermint creams. I remember the first time I made candy I was about 11 or 12 and made coconut ice. I absolutely hate coconut ice, but I made it because I knew that it was an easy recipe and that I probably wouldn't fail - and I didn't. Everyone else benefitted from my efforts!
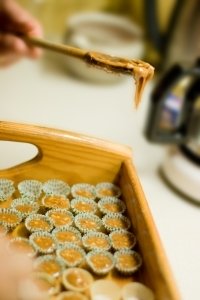 Homemade candy makes lovely
gifts, and one that is always appreciated,
for the personal touch adds so much to the pleasure of receiving.
Prettily wrapped, arranged, and presented, candies can look very
attractive, and there are so many different types of candy you can make
from fudge, truffles, nougats, jellies, Edinburgh rock, butterscotch
etc.
Best of all, most of the equipment needed is already in your kitchens. However, there are one or two items that we do suggest you buy and one of them is a good candy thermometer.

Traditionally, candies have been made by women, so there is nothing stopping you carrying on the tradition today within your own families!
Sooner of later most cooks want to try their hands at candy making, even if only to try the simplest toffee or peppermint creams. I remember the first time I made candy I was about 11 or 12 and made coconut ice. I absolutely hate coconut ice, but I made it because I knew that it was an easy recipe and that I probably wouldn't fail - and I didn't. Everyone else benefitted from my efforts!
 Homemade candy makes lovely
gifts, and one that is always appreciated,
for the personal touch adds so much to the pleasure of receiving.
Prettily wrapped, arranged, and presented, candies can look very
attractive, and there are so many different types of candy you can make
from fudge, truffles, nougats, jellies, Edinburgh rock, butterscotch
etc.
Homemade candy makes lovely
gifts, and one that is always appreciated,
for the personal touch adds so much to the pleasure of receiving.
Prettily wrapped, arranged, and presented, candies can look very
attractive, and there are so many different types of candy you can make
from fudge, truffles, nougats, jellies, Edinburgh rock, butterscotch
etc.Best of all, most of the equipment needed is already in your kitchens. However, there are one or two items that we do suggest you buy and one of them is a good candy thermometer.
This is especially
important if you are making hard candy as you need to get the
temperature fairly accurate otherwise you can end up with a total
disaster. And I am sure you have had your fair share of those.
I know I
certainly did back  in
the early days of candy making.
 in
the early days of candy making.
Candy Making Equipment
However, if you still want to try candy making and you don't have a thermometer we do tell you how to test your sugar state the old-fashioned way, without using a thermometer. See below.
Marble Slab - Not only is this wonderful for pastries, but great for sweet making too. If you cannot afford a slab of marble you can substitute with a large, well-oiled plate or baking sheet if you are pouring out liquid fondant or toffee. or you can use a pastry board well dusted with icing sugar for most other candy mixtures.
Saucepans- For candy making you really should invest in a good, heavy-bottomed pot. An ideal saucepan for making candy is one that is deep and rounded, narrower at the base, brass, stainless steel, thick copper are all suitable. A thin pan will not withstand the great heat needed for some candies and the mixture will burn.
Palette Knife or Sugar Scraper - A broad, flexible bladed palette knife or even a spatula will work. You need something that you can use when working with fondant, or toffee on the marble slab or scraping together marzipan.
Tins - A tin or two should be reserved for your candy making. They should be 1/4 inch deep for setting toffee, fudge etc. and will also need them for drying your candies off.
Other than that, you need a few extras such as:
- liquid measure
- wooden spoons
- sharp pointed knife
- sieve
- kitchen scissors
- pastry brush
- rolling pin
If
you have the above basic candy making equipment you will be fine.
However, if you have decided to go into candy making very seriously
there are other items of equipment you can buy:
- candy cutters
- peppermint rings
- fondant mats
- marzipan molds
- starch tray
- crystallizing tray
- dipping fork
Candy Making Ingredients
Whatever
you put into your candies make sure that the quality is good, and
choose natural flavorings where possible. Keep away from artificial
dyes. First of all they are not good for your health and secondly, why
make homemade candies with the same sort of rubbish you can buy at the
store with no effort involved? It kind of defeats the object, doesn't
it?
Sugars - are you your main ingredients. Usually granulated sugars are used, but a variety of brown sugars are also called for in some candy recipes: Demerara, dark and light brown, soft, moist sugars, castor and icing sugar.
Glucose - you can buy this at your drug store. This is often used to assist in keeping the property of the sweets and to prevent graining.
Butter - The best results in candy making is using unsalted butter, but ordinary butter can be used if you don't have any, but only use in small quantities.
Nuts - Walnuts, hazelnuts, peanuts, brazils, almonds, pistachios, pecans, etc. can all be used in candy making.
Cream of Tartar and Tartaric Acid - These are occasionally used instead of glucose to prevent graining. Also used as flavoring in some candy recipes - such as Acid Drops.
There are a number of other miscellaneous ingredients which are worth keeping on your pantry shelves if you are wanting these to be readily at hand:
- Gum Arabic crystals - get these from your drug store
- Glycerin
- Glace Fruits - apricots, cherries, pineapple, ginger
- Chocolate - the superfatted kind for coating, or ordinary plain or milk chocolate for flavoring
- Essences and Oils - buy in as concentrated form as possible; vanilla, peppermint, almond, lemon, orange, raspberry, strawberry, rose water, orange flower water
- Liqueurs are also useful flavorings, but rather more expensive
- Gelatin
- Rice Paper - for nougats especially
- Decorations - chocolate vermicelli, angelica, crystallized rose and violet petals
- Wax Paper
- Starch - confectioner's starch is best but cornflour will work as a good substitute
- Golden Syrup, treacle
- Evaporated milk, condensed milk
Homemade Colorings for Candy Making
As
mentioned before commercial colors for candy making should be avoided.
If you want to color your candy, you can do so using these homemade
coloring recipes.
Pink Coloring: Just use a few drops of liquid cochineal
Yellow Coloring: You can use liquid yellow coloring or you can use 1 oz saffron soaked in 1pint of water. However, you have to be careful with using saffron as it can leave the candy with a strong taste.
Amber Coloring: You can add caramel coloring to the mixture. To make this here is the recipe:
1/2 pint sugar
1/2 pint water
Put the sugar in a heavy based saucepan and let it melt over a low heat, stirring constantly, until it starts to turn brown. Then add the water quickly and continue cooking until you are left with a syrup that looks like molasses. Bottle until needed. You only need a teaspoon for the coloring. This will keep for about a year.
Green Coloring: Use spinach juice to get the desired color. Here is the recipe:
Wash 2 quarts of young spinach, then drain and pick the leaves off the stems and in a pestle and mortar crush the leaves to a pulp. Place the mixture carefully into a coarse muslin cloth or cheese cloth and squeeze the juice out of the leaves into a cup. Open up the bag, wet the leaves with a few sprinkling of water and squeeze the juice out once more.
Pour the liquid into a small saucepan and cook over a medium heat until the liquid starts to curdle and separate. Remove from the heat and filter through fine grade muslin or cheese cloth. This is your coloring for your candy making.
Take this and let it stand out in the open air until it hardens to a thick paste. Mix with equal quantities of sugar and bottle. You can use it for candy making without the sugar too.
Natural Homemade Flavorings for Candy Making
If you are making almond paste then a few drops of bitter extract of almond is what is needed.
If you need vanilla, don't go for the essence, use the vanilla bean and extract the flavors yourself.
If you are making orange candies then Curacao is the accompaniment here. However, you could also use the orange juice, but it is not as good.
So you can see that with a little bit more effort and time, you could be ending up making candies that will knock the socks off friends and family who try them!
Coffee Flavoring for Candy Making:
2 ounces ground Mocha coffee
1 gill boiling water
Placing 2 layers of cheese cloth over a tea cup and make a little depression for the ground coffee. Start pouring the water slowly over the coffee. As it starts to drip add more water. As it starts coming through now you can squeeze the cloth gently.
A few drops of this will flavor half a pint of fondant.
Citrus Flavoring for Candy Making:
This recipe can be used for any yellow colored candies.
1 lemon, grated
1 orange, grated
1/4 nutmeg, grated
6 whole cloves
1/2 pound sugar
1/2 pint water
Finely grate the rind of both the lemon and the orange. Make sure that you do not include the white pith. Add the grated nutmeg and mix together with your fingers until you have a good pulp.
Now add the whole lot to the water, with the cloves. Boil for 2 minutes and then strain through muslin.
Add this liquid to the sugar over a medium heat. Stir constantly until sugar is dissolved. Once dissolved now boil rapidly until a thin syrup is formed.
Laurel Flavoring for Candy Making:
7 good sized bay leaves
1/8 nutmeg, grated
4 cloves
2 tablespoons sugar
1 gill water
1 gill alcohol
Break the bay leaves, put them into a glass bowl with the cloves and the grated nutmeg.
Place over a saucepan of boiling water and add the gill of water to the bowl. Leave for about 15 minutes and then remove from the heat. Strain, add the sugar into the bowl and stir until dissolved. When dissolved and the mixture is cold add the alcohol. Bottle until needed.
This flavoring can be used for pink and white candies.
Nevada Peppermint Flavoring for Candy Making:
1 gill alcohol
3 drops oil of rose
3 drops oil of peppermint
Mix the ingredients together and then place in a bottle. Shake well and use when needed. 1 teaspoon will flavor 1 pound of sugar.
The Different Kinds of Candy
In
candy making there are so many different kinds of candies, from soft
fudge to hard peanut brittle and everything in between. And other than
pulled candies which are more difficult to get right, candy making is
fairly easy, as long as you follow our tips and advice here.
Fudge is boiled to 238 degrees F., cooled and then stirred or worked until the fudge becomes almost firm, before being turned out into a greased pan, or onto a buttered marble slab, to be marked into squares. Fudge should be firm, buttery and creamy in texture and not coarse or grainy.
Fondant is the foundation of most chocolate creams. It is made of sugar cooked with water or other liquids to 238 degrees F. The addition of an acid to the boiling sugar causes part of the sugar to change to glucose, resulting in a finer texture. Cream of tartar, acetic acid, vinegar or even lemon juice may be used.
Caramels are made by boiling the sugar mixture from 242-250 degrees F. They are not beaten after cooking and are soft and waxy.
Pulled Candy also known as Taffy is boiled from 254-260 degrees F. The mixture is then poured out on to a greased marble slab, and when cool enough pulled until it is of the correct consistency to be cut. See how to make taffy below.
Hard Candy, like butterscotch - which is my absolute favorite! - or barley sugar, are boiled from 290-330 degrees F. When finished they should be thin and very brittle.
Gelatin Candy like Turkish Delight are not as sweet as others, as they become firm with little boiling, and less sugar is used. Gelatin should always be soaked in cold water until the liquid is absorbed, then dissolved in or over boiling water or hot syrup. Gelatin candies should be tender and never have the texture of rubber. If they do, you have used too much gelatin.
Candy Making Secrets
Now we are finally ready to give you those secrets to making those homemade candies!- Make sure that you have all the right ingredients out on the counter top before you start. There is nothing worse than finding half way through a recipe that you don't have half the ingredients.
- Next measure your ingredients out and place them in order of the recipe. In candy making sometimes speed is really important in getting the ingredients into the mixture and you won't have time to measure them out at the time. Be prepared, and this minimizes the need to panic while you are working.
- Read your recipe twice, double check your ingredients and then start adding according to the recipe.
- When you are ready to use your candy thermometer read the thermometer at eye level. Shake it well before you use it to make sure there are no bubbles in the mercury if you are using a mercury based thermometer. Keep it standing in hot water so that when you place it into the hot syrup there is not sudden change of temperature that could cause it to crack.
- Season a new thermometer by placing it in a pan of cold water and bringing it slowly to the boil and remove from heat. Leave it immersed until the water has become quite cold.
- If you are going to add colorings to your syrup do so sparingly as they are very strong. You only need a very small amount to make the color you need. So you can add the color by using a dropper or the end of a skewer or toothpick. You can always add more. Once it is in, you cannot make it lighter unless you make up another batch of fondant or whatever you are using.
- When weighing your treacle or syrup either weigh the pan first then add the treacle or syrup and weigh again, or if a dry ingredient is used such as sugar, weigh this first then pour the treacle or syrup on top to the additional weight required.
- When making fondant, if you don't have a marble slab, pour the mixture into a bowl and leave it until it is only moderately warm, about 15-20 minutes, then stir with regular gentle strokes until it becomes white and creamy, pour into a greased, greaseproof paper and knead by hand.
- If your marzipan has become too dry when working with it, soften it with a little stock syrup:
Recipe for Stock Syrup
1 lb granulated sugar1/2 pint cold water
1/4 teaspoon cream of tartar
1 teaspoon glucose
Put
all ingredients together into a saucepan and follow the directions for
sugar boiling. Boil to 227 degrees F. Pour the syrup when cool enough
into a jar. Seal when cold. It will keep for some time.
When working with sugar you need to dissolve it over a very low heat otherwise you will end up burning the sugar which will ruin your candy. Make sure that every grain of sugar has been dissolved before bringing the mixture to the boil.
Bring to the boil and place a lid on the saucepan for just a minute or two. This allows the steam build-up inside to wash down the sides of the saucepan of any sugar granules you may have missed. Remove the lid before boiling point of 212 degrees F. Skim the saucepan if necessary.
Now put in the thermometer which has been standing in hot water and allow the boiling to continue until the required temperature is reached. Keep a wet pastry bush nearby for washing down the sides of the pan if crystals start to form.
Remove the pan from the heat; dip instantly into cold water for a second or two to arrest any further rise in temperature. On no account stir the syrup whilst boiling unless required to do so as, this may well cause graining. If the worst should happen and the syrup starts to crystallize, add more cold water andN start the melting process over again. The result though will not be as satisfactory.
In some candy mixtures it is impractical or even impossible to use a sugar thermometer, particularly where constant stirring is needed, and it is then necessary to check the state of the syrup by regularly dropping a little into icy cold water. The following table gives you the different stages of sugar boiling and how to recognize them. Remember that sugar boils at 215 degrees F.
- If you are cooling your candy place in a dry, cool place and not the fridge.
- To keep your candies fresh, place in air-tight containers.
- Candy recipes that have milk, cream, butter or molasses in them should not be cooked on a very high heat as they are more likely to stick to the bottom of the saucepan. Stir gently to make sure that they don't granulate but also making sure that they don't stick and burn.
How to Prevent Crystallization in Candy Making
Crystallization
is one of the biggest problems you will face when making candy. There
are a number of things you can do to prevent this:
- Mix ingredients well.
- Stir only until sugar is dissolved and then no more unless otherwise directed in the recipe.
- Do not allow mixture to boil until the sugar has completely dissolved.
- Do not shake or disturb the sugar while it is boiling as it could granulate.
- Keep sides of saucepan free from dry sugar crystals by wiping down with a damp cloth or pastry brush, or the lid of the saucepan may be replaced for a few minutes so that the steam washes down the crystals. However, never put the lid on candy mixtures that contain milk, cream, butter or molasses as they will soon boil over.
- Allow candy mixture to drain from the saucepan, but do not scrape saucepan out, as this will cause coarse crystals to form.
- Try and get your candy to cool as quickly as possible, without putting it in the fridge. As the longer it takes to cool, the more chance you have of it granulating or "turning to sugar."
- Always make candy on a sunny day rather than a rainy day. Too much moisture in the air will cause your recipes to be less successful. This is especially true if you are making hard candy.
- Always add cold water and never add more than you are told as it needs to cook out before the candy is ready.
- Never heat the sugar beyond the stated temperature. If you do you can add a little water to bring it back down, but it is not always successful, especially if you allow it to go too far.
Candy Making and Sugar State Table
| Sugar State | Temperature | Uses |
| The Smooth | 215-220 degrees F. | This is used for crystallizing purposes |
| The Thread | 225-230 degrees F. | A spot of syrup between finger and thumb will form a fine thread when pulled apart. The thread will break at 225 degrees F. |
| The Pearl | 230 degrees F. | Small, pearl-like bubbles will form all over the surface of the syrup. Test as for the the thread. |
| The Blow | 235 degrees F. | Dip the loop end of a skewer into the syrup, remove it quickly and blow through the hole. Small bubbles should form and float for a second or two before bursting. |
| Soft Ball | 240-245 degrees F. | Test as for the blow, but when blowing through the hole the syrup will feather out instead of forming bubbles. Fondant is made at this temperature. |
| Hard Ball | 250-260 degrees F. | Dip thumb and forefinger into water, then into the syrup and immediately back into the water. The syrup should then roll into a soft ball, but becoming firmer as the temperature increases. |
| The Crack | 280-300 degrees F. | Drop a little syrup into cold water and it will become brittle and a thin piece will snap easily. With this state you also get the hard crack stage which is when the sugar reaches the high end of the temperature range from 290 degrees F. |
| Caramel | 310-350 degrees F. | The syrup changes color at this temperature from light, brown becoming darker as the temperature increases, eventually burning. |
How to Make Pulled Candy or Taffy
Pulled
candy, also known as taffy is a particular aspect of candy making that
requires careful timing, speed and heatproof hands!
Start by making sure all utensils, including the hands are well oiled. The syrup to be used for pulled candy usually incorporates glucose, cream of tartar or some acid to help prevent granulation.
The mixture is boiled to a higher degree than fudges and candies, the mixture being poured onto a well oiled surface, coloring and flavors being added and allowed to settle.
Using a spatula begin turning the edges into the center all around to prevent uneven hardening of the mixture. When it can be formed into a rather slack sausage shape, and it is just about cool enough to handle, take up the toffee mass into well oiled hands.
Use fingers as much as possible and avoid getting the hot mixture into the palms.
Stretch out the 'sausage' then fold in half, taking the two ends in either hand, pull out and fold again. Repeat the process over and over again, for about 5 -10 minutes when the mass will gradually increase in volume as air is incorporated, become opaque and a milky shade of the added coloring. While it is still pliable, form or cut into twisted sticks, cushions (give a half turn with each cut of the scissors), or balls.
Finishing off your Candies
Candy
making is an ideal hobby to have as you can wrap your candies up
beautifully and give them away as gifts for friends and familyl, as
already mentioned. This is
particularly true for those special occasions like Christmas, Halloween
or Easter.
So if you are going to give your candies away buy some pretty cellophane paper that is precut into squares and wrap them in those once they have set.
By taking a trip to your local stationery store you may be surprised to see what else you could use. Small bags stuffed with shredded cellophane paper with the candies on the top also look lovely.
Boxes and glass jars work too. If you are going to use a box, you may want to add shredded paper to the bottom of the box to protect your candy. Chocolates and marzipan don't need to be wrapped.
Trim with pretty ribbon, and don't forget a handmade swing tag to attach to your candy gifts.
Did you find this page helpful?
Sharing is a way of saying, "Thanks!"





New! Comments
Do you have something of value to add? Leave me a comment in the box below.